Whoever said that the best things in life are complex clearly never tried our Simplest Flaky Pear Tart recipe. In our bustling lives, we’re always on the search for that easy pear dessert that brings both comfort and a touch of elegance to our table. The delicious pear dessert we’re about to introduce not only achieves this but does so with an effortless charm that will make any home baker proud. The blend of sweet, soft pears with a simple pastry tart promises a heavenly outcome.
Imagine the sweet aroma of baking pears filling your kitchen, as you pull out a golden, quick pear tart recipe masterpiece that’s as delectable to the eyes as it is to the palate. Whether you’re aiming to impress at your next brunch or simply craving a slice of something sublime, our tart hits all the right notes of ‘delicious’ and ‘doable’. Let’s guide you through creating this masterpiece with ease, shall we?
Key Takeaways
- The joy of a sweet pear treat with minimal effort and a press-in crust.
- Tips for achieving the perfect glaze without melting jelly for a shiny finish.
- A guide to an easy pear dessert suitable for both novice and experienced bakers.
- Strategies for impressing guests with a homemade pastry that looks and tastes professional.
- Enthusiasm for baking as a combination of gracefulness and practicality.
There you have it, our simple yet effective pathway to a delightful pear tart. With these key takeaways, you’re now ready to create your own slice of heaven. So roll up your sleeves, preheat that oven, and let’s get baking!
The Charm of a Simple Pear Dessert
Discovering the best pear tart recipe involves appreciating the natural sweetness of the fruit and the sheer pleasure in creating an easy pear dessert. There is true beauty in simplicity, which we honor in our approach to crafting a delicious pear dessert. A simple amalgamation of flour, butter, and sugar atop ripe pear slices translates into a treat that, while uncomplicated, never fails to delight and impress.
Our shared love for a sweet pear treat is exemplified in the rustic elegance of a good pear tart. Contrary to what many might think, a refined dessert doesn’t require an endless list of complicated ingredients or elaborate steps. It shines in its unadorned form, but still boasts a charming allure that can lure any dessert lover into taking that first bite.
Pears have a humble way of dressing up for the occasion with nothing but a sprinkle of flour, sugar, and a pat of butter. They bubble under the heat to emerge as the star of a glistening glaze, all without the need for finicky basting or brushing.
Let’s delve into the harmonious symphony between texture and taste in our rendition of the quintessential pear tart. Stay with us as we combine taste with simplicity, creating an easy pear dessert that’s as satisfying to make as it is to eat. Whether you’re a seasoned baker or a first-timer, our best pear tart recipe is designed to guide you with ease towards your new favorite autumnal indulgence.
For those who are eager to create a delicious pear dessert without the daunting commitment, this is the guide you’ve been waiting for. An essential, yet profound kitchen adventure awaits as we marry convenience with the art of baking. Our method ensures that your journey in making the sweet pear treat is as pleasurable as savoring the final product. Here is to the joys of baking simplified, where the humble pear is celebrated in all its golden, seasonal splendor.
Embracing the Versatility of Pears
We often celebrate apples and pumpkins as the heralds of fall, yet the pear’s versatility in baking is truly something to be savored. This juicy and soft fruit pairs magnificently with the simplest of ingredients, transforming a straightforward pastry recipe into a delicious pear dessert. The best part? The simple steps required to make a pear dessert amplify the natural sweetness of the fruit, resulting in a simple pastry tart that’s nothing short of divine.
But before we dive into the art of pear tart creation, let’s first pay tribute to this often underappreciated fruit. Its ability to fold into the background or stand center stage makes it a valuable asset to any baker’s repertoire.
Celebrating the Underappreciated Pear
When thinking of a sweet pear treat, we should tip our hats to the versatility of this fine fruit. Pears come in various textures and flavors, each unique in its capacity to carry a dessert from pleasant to extraordinary. Whether it’s the hallmark of a best pear tart recipe or an experimental pairing with spices, pears have the humble power to all but steal the show.
Choosing the Right Pear Variety
For a truly memorable homemade pear tart, the selection of the right pear is paramount.
While there are many to choose from, the Bosc variety stands out as the muse for our tart creation. Known for its firmness and honey-sweet essence, this pear retains its texture and flavor through the baking process, emerging as the perfect pear to nestle into our flaky pastry crust. The ripeness of the pear is also crucial as it contributes the necessary moisture to create that coveted glistening glaze – the signature of a truly delicious pear dessert.
Now, as the cool winds begin to swirl and the leaves find their autumn hues, join us as we embrace the ripe, juicy essence of pears in our baking adventures. There’s a sweet satisfaction in creating something so delightful from such humble beginnings—a simple pastry tart that’s bound to become a beloved classic in your recipe collection.
Gathering Your Pear Tart Ingredients
Embarking on the journey to create a Homemade pear tart begins with the simplest step: gathering your ingredients. We believe in using high-quality, fresh items that promise to make your tart a hit at any gathering. Here’s a guide that details the key Simplest Flaky pear tart ingredients, ensuring you have everything you need to bake a pastry that’s nothing less than perfection. So let’s take a look at what you’ll need to bring this dreamy dessert to life.
Flour serves as the foundation, thickening agent, and structural hero of your crust. To pair perfectly with the softness of ripe pears, we opt for a mixture of whole wheat and all-purpose flour for a slightly nutty flavor and a tender crumb. Sugar not only sweetens the deal but also contributes to that desirable golden finish on the baked crust. We’re all about achieving a balance between sweet and subtle savors.
The choice between butter and margarine is yours to make, dependent on dietary preferences and desired richness. Trust us, either will work wonders for that melt-in-your-mouth texture. Meanwhile, mild olive oil or alternatively canola oil introduce a light moisture and delicate cohesion to the crust.
As our liquid element, water or milk assures your crust reaches its ideal consistency for pressing into that tart pan. And let’s not forget a dash of good old vanilla for an aromatic backdrop that ties all the flavors together.
Of course, the pièce de résistance, ripe pears, are what make our tart a resounding success. Sourced locally or from your trusted grocery store, these fruits should be perfectly ripe to lend their juiciness and natural sweetness to your delectable creation.
| Category | Ingredients | Notes |
|---|---|---|
| Crust | Flour, Salt, Sugar, Olive Oil, Water or Milk, Vanilla | Option to use half whole wheat flour for a unique flavor |
| Moisture | Butter or Margarine, Mild Olive Oil or Canola Oil | Choose butter for richness or margarine for a vegan option |
| Sweetening Agent | Sugar | Adjust according to desired sweetness level |
| Filling | Ripe Pears | Select from red, yellow, or Bosc, depending on flavor preference |
Now that we’ve laid out the essential ingredients, it’s time to prepare them with love, seeping each bite of your Homemade pear tart with the warmth of home cooking. Keep these ingredients at hand, and you’ll be well on your way to creating the Simplest Flaky pear tart that stands testament to your culinary prowess.
Simplest Flaky Pear Tart: The Technique
Mastering the perfect simple pastry tart begins with the crust; it’s the foundation that holds the luscious pear filling. In our kitchen, we’ve found that the key to a memorable flaky pear crust is in the quality and combination of ingredients. Let’s walk through the steps to achieve that melt-in-your-mouth experience that’s quintessential to a delicious pear dessert, shall we?
Mastering the Flaky Tart Crust
Our quick pear tart recipe requires just a few staple pantry items to create a crust that’s divinely flaky and utterly delicious. Start by mixing the base components: your choice of flour and a pinch of salt. Then introduce oils, our secret to the tender, flaky texture. Our process involves lightly combining the oils with the dry mixture until you have a wonderfully crumbly mix.
Next, add a splash of water or milk—just enough to bring the dough together without overworking it. This hands-off approach is what maintains our crust’s delicate layers. Pressing the dough into the pan is an art in itself, ensuring an even base for the succulent pear topping that follows.
Assembling Your Pear Tart Effortlessly
The charm of a simple pastry tart lies in its assembly, enjoyable and straightforward, just like the recipe’s namesake. Begin by arranging thinly-sliced pears in concentric circles, transforming the base into a canvas of rustic art. Over this, sprinkle the crumb mix—nothing more than a blend of flour, sugar, and butter. But oh, the magic it makes when heat is applied!
This crumb topping, acting as the final flourish, melts into the pears, creating a lush, glistening glaze that signifies our best pear tart recipe has reached fruition. Rest assured that with this easy pear dessert, you’re just a bake away from enchanting your guests with a pastry that visually captivates and tantalizingly satisfies the palate. After all, we’re on this culinary journey together, celebrating life’s simplest pleasures—one pear tart at a time.

Baking Your Quick Pear Tart Recipe to Perfection
As we embark on the final leg of our culinary quest, it’s time to transform our preparation into a fragrant, golden masterpiece. Patience and precision are our guiding stars as we bake our easy pear dessert to perfection.
Let’s walk through the rewarding process of baking. With our quick pear tart recipe in hand, you’re only moments away from a delicious pear dessert that epitomizes both elegance and simplicity. Here are the steps to ensure your pear tart is nothing short of sublime:
- Preheat your oven, setting it to the golden sweet spot that ensures even baking and a delightful crust.
- Prepare your tart pan with the pressed-in dough, ensuring it is even and set for the scrumptious filling.
- Layer the fresh, ripe pears in a pattern that pleases the eye, knowing that each slice will reveal a beautiful arrangement.
- Mix the topping ingredients to form a crumbly glaze that will give the tart a glistening finish.
- Gently sprinkle the crumb mixture over the pears, covering them with what will become a caramelized joy.
- Place your tart in the oven and watch as the transformation begins, baking for 35 to 45 minutes.
- Once the crust edges are browning, and the glaze shares a shiny invitation, your pear tart is ready to come out.
The result? A quick pear tart recipe that yields a delicious pear dessert with a flaky, golden crust and a luscious pear topping, gleaming under the kitchen lights.
We believe the best moments come from the simplest things, and our easy pear dessert is a testament to that. The perfect shine, the sweet aroma, and the flaky crust all come together, creating a treat that’s as beautiful to look at as it is rewarding to craft.
So, here’s to us, our ovens, and the cycles of warmth and sweet scents that hug our homes. Our delicious pear dessert stands ready to be shared and savored, carrying the quiet pride of a dessert crafted to perfection.
In the spirit of excellence, let’s review our baking table—a capsule of information encapsulating the essential steps for your go-to reference as you bake the tart:
| Step | Action | Outcome |
|---|---|---|
| 1 | Preheat Oven | A steady, optimal temperature for baking |
| 2 | Prepare Tart Pan & Dough | Ready for filling and baking |
| 3 | Arrange Pears | Aesthetic and delicious filling |
| 4 | Mix & Apply Topping | Crumbly mixture for the glaze |
| 5 | Bake | A crisp, golden brown crust |
There we have it, fellow bakers—our guide to perfectly baking a delightful easy pear dessert. We’ve dotted our ‘i’s and crossed our ‘t’s, ensuring each of you can take pride in the beautiful tart that emerges from your oven. Come, let’s gather and bask in the sweet success that awaits at the ding of our kitchen timers.
The Final Touch: Serving and Presentation
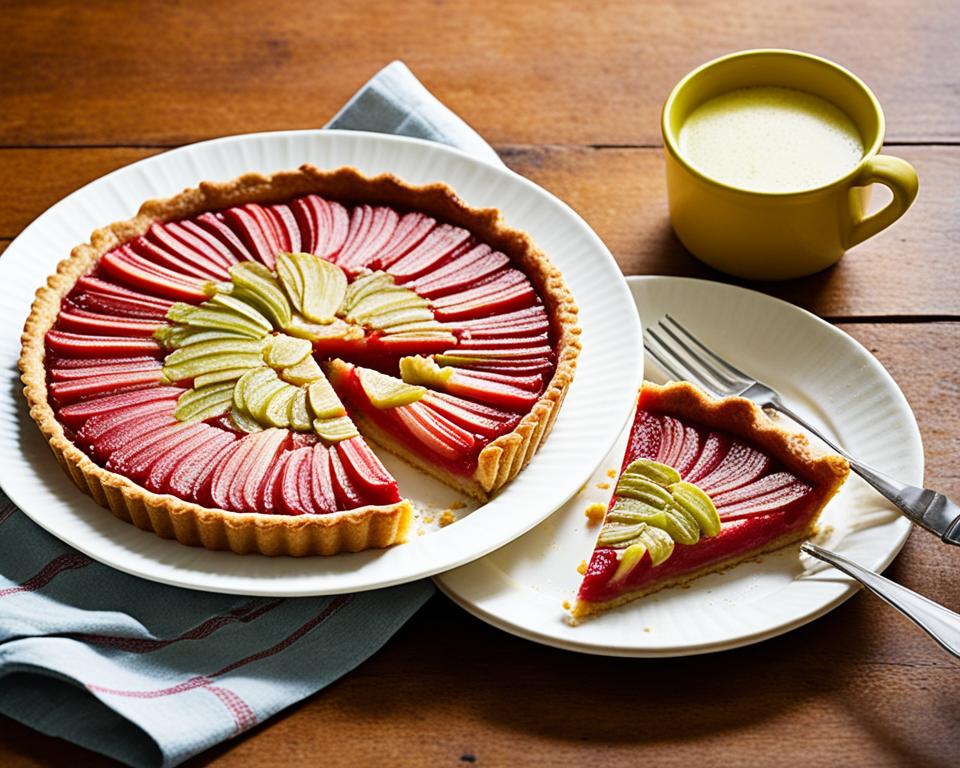
We’ve crafted our Simplest Flaky pear tart with love, and now it’s time to present it in all its glory. The right serving temperature allows the flaky crust and the sweetness of the pears to shine through in each slice. No best pear tart recipe is complete without the grand finale — a presentation that highlights the care you’ve invested in layering each component, from crust to glaze. After the fragrance of baked pear has infused your kitchen, it’s time to make this easy pear dessert a visual treat as well.
Cutting and Plating Your Homemade Pear Tart
Once our tart has had the chance to cool slightly, careful slicing is paramount. We aim for that pristine cut that showcases the meticulous arrangement of pears. When we plate our tart, it’s an opportunity to put our personal touch on this delightful easy pear dessert. Serve up this sweetness on plates that complement its rustic charm, and you’re sure to make an impression.
Pear Tart Toppings and Accompaniments
While our Simplest Flaky pear tart can undoubtedly stand on its own, why not add a touch of decadence? A dollop of freshly whipped cream balances the flavors, and a mint leaf garnish not only adds a pop of color but also a refreshing twist. These garnishes don’t just elevate the taste; they’re the accessories that turn a homemade pear dessert into a memorable one.
Let’s put together an elegant service for our tart that makes every guest feel like the guest of honor:
| Action | Recommendation |
|---|---|
| Cutting the Tart | Use a sharp serrated knife to gently saw through the layers, ensuring clean slices. |
| Whipped Cream | Opt for homemade whipped cream for a rich and luxurious topping. |
| Mint Garnish | A small mint leaf on the side adds a hint of color and freshness. |
And there you have it, our friends, the crowning step in the journey of creating the perfect easy pear dessert. Take pride in these final touches and bask in the compliments sure to come your way. After all, with our best pear tart recipe, each slice represents our shared passion for sweetness and simplicity in baking.
Customizing Your Pear Tart
Our love for a good pear tart runs deep, especially when it’s the Simplest Flaky pear tart that one can enjoy making. But, what makes a dessert special is how it can be tailored to fit every taste and dietary preference. Today, we’re excited to share the myriad ways you can customize this versatile quick pear tart recipe to your liking.
Whether you identify as a vegan, follow a gluten-free diet, or simply love to experiment with flavors, our pear tart recipe comes with the flexibility that you’ll appreciate. We believe that everyone should have a slice of this heavenly tart, which is why we offer variations without compromising on taste or texture.
For our vegan friends, replacing butter with margarine, and using dairy-free milk or water, makes for an equally sumptuous tart. As for our gluten-sensitive pals, a quick swap of standard flour with your favorite gluten-free blend is all you need to enjoy this tasty treat. It’s the inclusivity for us!
But why stop there? Depending on the season or your fruit bowl, feel free to substitute pears with other juicy fruits like plums or peaches. Each fruit brings its own unique sweetness and character to the tart, making it a new experience every time.
Add a pinch of spice to your life, or in this case, your tart! Introducing spices such as cinnamon or nutmeg can add a warming note for those cozy autumn days. Aromatic and inviting, a spiced pear tart takes comfort food to a whole new level.
| Customization | Ingredients | Benefits |
|---|---|---|
| Vegan Friendly | Margarine, Dairy-Free Milk/Water | Suitable for vegan diets while keeping the golden, lush texture. |
| Gluten-Free Adaptation | Gluten-Free Flour Blend | Everyone can indulge without gluten worries. |
| Fruit Variations | Plums, Peaches | Express seasonal freshness and personal preference beautifully. |
| Added Spice | Pinch of Cinnamon or Nutmeg | Infuse a warm, aromatic flavor that complements the sweetness of the fruit. |
Isn’t it lovely that our Simplest Flaky pear tart recipe can be a canvas for your culinary creativity? By keeping the core steps simple, we allow room for you to play with flavors and textures. Whatever alterations you make, we’re confident that your adaptation of this quick pear tart recipe will be a delightful exploration into the world of baking. Showcase your personal twist and share the joy that a good tart can bring!
Maintaining the Quality of Your Delicious Pear Dessert
After you’ve wowed your guests with a delightful slice of our homemade pear tart, ensuring the remaining treats remain just as tempting is essential. The proper preservation of your sweet pear treat is not just about prolonging its life—it’s about keeping the flavors as vibrant and inviting as they were fresh out of the oven. We’ve gathered some invaluable tips to help ensure that every piece of your easy pear dessert maintains its appeal for days to come.
Storing Leftovers for Optimal Freshness
We understand that not all delicious pear desserts can be enjoyed at once, and sometimes you’ll need to save the sweet sensations for later. The key to keeping your simple pastry tart delightful is proper storage. By placing any leftover tart in the refrigerator, you can help to maintain the crispness of the crust and the lushness of the pear filling. Ideal refrigeration can keep your easy pear dessert fresh, letting you enjoy its sweet and succulent flavor for a couple more days.
Here’s a quick table to ensure you’re storing those treats the right way:
| Storage Method | Expected Outcome |
|---|---|
| Refrigeration | Maintains dessert freshness for 1-2 more days |
| Airtight Container | Prevents moisture loss, retaining the dessert’s tender texture |
| Cool, Dry Place | Ensures that the crust stays flaky and delightful |
Make-Ahead Tips for Entertaining
When planning for a gathering, our easy pear dessert can be a fabulous show-stopper that’s also kind to your schedule. A good homemade pear tart can be prepped ahead of your event, with focus on the initial bake of the crust. Getting that golden, sugar-crystallized edge just right is crucial for that sweet, crunchy finish. Then, when it’s closer to your event time, you can easily assemble the tart to ensure it remains the delicious pear dessert everyone anticipates. This way, the enchanting flavors are fresh, and your sweet pear treat looks as if you’ve been toiling away just moments before serving. Strategic prep leads to divine desserts!
Conclusion
As we wrap up our culinary journey, we revel in the satisfaction that our Simplest Flaky Pear Tart brings to the table. Fusing ease with elegance, our recipe is indeed a shining example of the best pear tart recipe a home baker can ask for. It’s not just about crafting an easy pear dessert; it’s about the joy of sharing a slice of something homemade that’s truly special, the pride in seeing friends and family savor every bite, and the delight in knowing it all came together without undue stress or strain.
From its flaky, buttery crust to its tender, perfectly glazed pears, every element of this tart harmonizes to create flavors and textures synonymous with comfort and celebration alike. This is the dessert that champions your baking skills, elevates your gatherings, and turns any meal into a memorable feast. Even if you’re just beginning to explore the vast world of pastries, our quick pear tart recipe is proof that sensational desserts are within everyone’s reach.
We’re thrilled to have embarked on this delicious adventure with you, sharing each step to ensure that your experience in making our homemade pear tart is as rewarding as the smiles it brings. So preheat your ovens, roll out your dough, and prepare for the wholesome goodness of a dessert that is destined to be a beloved addition to your recipe collection. The Simplest Flaky Pear Tart isn’t just a treat; it’s an expression of the simple, yet abundant, pleasures that baking brings into our lives.
FAQ
What makes this pear tart recipe the easiest?
Our Simplest Flaky Pear Tart is easiest because it uses simple, readily available ingredients and a press-in crust technique that makes assembling the tart a breeze, even for beginners.
Can I use a different type of pear for this recipe?
Yes, you can use a variety of pears for this recipe. However, Bosc pears are recommended for their firmness and flavor after baking. Ensure your pears are ripe for the best moisture and sweetness.
Is it possible to make this pear tart with a gluten-free crust?
Absolutely! You can substitute the regular flour with your preferred gluten-free flour blend to make a crust suitable for those with gluten sensitivities.
What’s the secret to a flaky tart crust?
The flakiness comes from the right proportion of ingredients and method of combining them. It’s important to mix the flour, salt, oil, and water or milk just enough to bring the dough together without overworking it.
Do you have tips for assembling the tart to ensure it comes out perfectly?
For a beautifully assembled tart, arrange the pear slices in concentric circles and evenly sprinkle the crumb topping before baking. This not only ensures even cooking but also a stunning visual presentation.
How long should I bake the pear tart and at what temperature?
Bake the tart in a preheated oven at 375°F (190°C) for approximately 35 to 45 minutes or until the crust is browned and the glaze is shiny.
How should I serve the pear tart for the best experience?
Serve the pear tart warm to enjoy the flaky crust and tender pears. For an extra touch of elegance, add a dollop of whipped cream or a sprig of mint as garnish.
Can this pear tart be made vegan?
Yes, simply use plant-based butter or oil and a vegan crust recipe to adapt this tart to a vegan-friendly dessert.
What’s the best way to store leftover pear tart?
Keep any leftovers in the refrigerator, properly covered, to maintain the dessert’s freshness for a couple of days.
How far in advance can I prepare this tart if I’m planning to serve it at an event?
It’s best to prepare the crust ahead of time and bake it until it’s crisp and golden. Assemble the rest of the tart closer to the event to ensure the pears and crust are fresh and maintain their textures.