There’s something truly special about biting into homemade samosas, with their flaky, golden crust enveloping a spicy, aromatic filling. These crispy samosas are not just a treat for the taste buds, but also a representation of cultural fusion and culinary craftsmanship. Originating from the Middle East and becoming a staple in South Asian cuisine, samosas have captured hearts worldwide. And now, the art of creating these delicious samosas at home is within reach. With the right techniques and ingredients, anyone can craft samosas that boast the perfect balance between a crispy exterior and a richly flavored interior—a harmony that has made this snack a universal favorite.
Whether preparing for a family gathering, a festive occasion, or simply indulging in a savory snack, mastering the golden, flaky samosa is a journey well worth undertaking. So roll up your sleeves and get ready to dazzle friends and family with your homemade samosas that are sure to bring a crunch of delight to any table.
Key Takeaways
- Homemade samosas offer an unbeatable freshness and flavor that store-bought versions simply can’t match.
- The secret to a flaky samosa crust lies in the preparation technique and the right flour-to-fat ratio.
- For crispy samosas, the perfect blend of spices and a meticulous frying process are paramount.
- Delicious samosas can transform any gathering into a festive soiree, with flavors that are both traditional and comforting.
- Creating samosas at home allows for customization of ingredients, ensuring a tailormade snack for all preferences.
- A knack for details, from the dough to the filling to the frying, culminates in the ultimate samosa experience.
The Rich History of Samosas: An International Snack
The story of the samosa is as rich and varied as the flavors packed within its crispy, triangular folds. This delightful snack, which we often associate with Indian cafes and street food stalls, has a lineage that reaches far back into the annals of history, beginning its life in the Middle East.
It was the traveling merchants who first brought these savory pastries to India, where their popularity skyrocketed. As they traversed the international culinary landscape, Indian samosas evolved, imbibing local flavors and regional cooking customs, turning into the showstoppers of today’s snack world.
They have established themselves as a versatile culinary icon, seamlessly fitting into the tapestry of international cuisine. From lavish festival spreads to humble tea-time treats, authentic samosas have carved out a distinct niche in the global culinary arena.
One simply cannot overlook the samosa’s omnipresence during significant events and religious observances, a testament to its ability to bring people together. This snack exemplifies the essence of comfort food, bridging cultures and transcending borders to delight palates all over the world.
Nowadays, the samosa remains a cherished item in eateries and homes alike. Whether one craves a filling made of spiced potatoes, tender meats, or a fusion of unconventional ingredients, the samosa, true to its international standing, continues to adapt and thrive.
Such widespread acceptance speaks volumes of the samosa’s enduring appeal and its celebrated position as a remarkable dish in both the antiquity of the Middle East and the vibrant street food scene of India.
Key Ingredients for Authentic Indian Samosas
Nailing the perfect homemade samosa involves embracing the timeless trio of elements: the foundational potatoes for the filling, a medley of herbs and spices for that all-important flavor, and just the right blend of flour and fats for crafting the flaky, crispy samosa dough we all crave. Each component is crucial in encapsulating the essence of this beloved Indian snack.
Potatoes: The Foundation of the Filling
The humble potato, boiled to perfection and crumbled, forms the heart of the samosa. This starchy base is anything but plain, providing a canvas for the flavorful samosa filling that packs a punch in every bite. The right choice of potatoes ensures that the vegetarian samosas have the desired, satisfying texture, making them an irresistible part of any meal or snack time.
Herbs and Spices: Flavoring the Potato Mixture
What sets samosas apart from mere pockets of pastry are the robust flavors that penetrate every aspect of the filling. Aromatic coriander, piquant Kashmiri red chili powder, warming garam masala, earthy cumin powder, tangy amchur, and the optional hint of fennel powder all combine in a fragrant dance, sautéed to create a spicy samosa filling that’s as authentic as it is delicious.
Flour and Fats: Crafting the Perfect Samosa Dough
The secret behind that much-sought-after flaky samosa dough lies in an ancient technique of integrating fat into flour. When fat, be it oil or ghee, is worked into the flour until the mixture resembles breadcrumbs, it’s a telltale sign of a samosa dough destined for greatness. Achieving this milestone is essential to ensure the finished samosa stands up to the title of crispy samosas, enveloping the flavorful filling in a delicious embrace.
Pro Tips for Crispy Samosa Dough
When it comes to creating the best samosas at home, the secret lies in the perfect assembly of crispy samosa dough. A cornerstone of flaky samosas is achieving that signature golden crunch, which can be quite the culinary feat. Here are some tried-and-true tips to ensure your samosas have that authentic, irresistible texture every time.
Correct Flour-to-Fat Proportion: Begin with a solid foundation by measuring your all-purpose flour and fat accurately. An adequate ratio is essential to form the base of a flaky crust. Strive for a mixture that clings together when pressed without crumbling, a clear indicator that your flour and fat are well integrated.
Carom Seeds—The Flavor Booster: Known for enhancing the flavor profile of your samosa pastry, carom seeds (ajwain) also play a pivotal role in the digestion process, making them a double win for your dough preparation.
Step-by-Step Dough Rubbing Technique: Patience is your ally here. Gradually work the oil or ghee into the flour mixture, rubbing it together until you achieve a breadcrumb-like texture. This is the key to ensuring that your samosas are not just ordinary, but part of the elite crispy samosas crafting league.
Water—The Binding Element: Add water cautiously to form a stiff yet flexible dough. Too much water can lead to an oily outcome after frying, something that samosa connoisseurs aim to avoid. The dough’s consistency is paramount; it should be pliable without sticking to your hands. A tighter dough equals a more delightful crunch post frying.
Resting Time Matters: Allow the samosa dough to rest before rolling it out. This relaxation time gives the dough the strength required to hold the delicious filling and turn into the flakiest of samosas upon frying.
| Ingredient | Quantity | Purpose |
|---|---|---|
| All-purpose flour | To taste | Provides structure |
| Carom seeds (Ajwain) | To taste | Adds flavor and aids digestion |
| Salt | To taste | Enhances flavors |
| Oil or Ghee | Correct proportion | Creates flakiness |
| Water | Sparingly | Binds dough, affects texture |
With these pointers in hand, you’re well on your way to mastering the art of the best samosas with a pastry that boasts delicate layers, ready to be filled with your favorite stuffing. Crafted with care and attention to detail, your flaky samosas are guaranteed to be a highlight at any gathering.

Mixing the Dough: The Path to Flakiness
Embarking on the quest for creating homemade samosas, the first step is to concoct the perfect samosa dough, the bedrock of crispy samosas. This dough, with its potential for sublime flakiness, is where the alchemy of texture begins. It requires precision, care, and a reverence for tradition—a combination that yields the unparalleled layers of pastry that Indian samosas are lauded for.
Creating a Breadcrumb-Like Texture
For flaky samosa pastry, the rubbing technique is non-negotiable. Picture the scene: a bowl of flour sifted so fine it clouds the air with its starchy perfume, awaiting the rich addition of oil or ghee. This is not merely mixing; it is an act of marrying ingredients until they reach a consistency reminiscent of breadcrumbs. Under your dedicated touch, the flour transforms, ready to become the golden shells of the best samosas.
Water Integration: Balancing Dough Consistency
The next pivotal moment in the ceremony of samosa dough crafting arrives with the introduction of water. This decisive element should be added with a controlled grace, avoid an excess which would mar the dough’s integrity. The goal here is a pliant, firm foundation—neither sticky nor crumbly—a harmony that ensures the resulting Indian samosas are as delightful to hold as they are to behold.
Achieving the perfect consistency is akin to a balancing act, where the water’s quantity is just enough to allow the dough to clasp onto itself without losing its composure. Once this delicate equilibrium is reached, you stand before the gateway to the realm of crispy samosas.
Whether frying for a casual gathering or a festive celebration, this dough is the canvas upon which the myriad flavors of your filling will unfold, making each bite a rhapsody of taste and texture. The result? Homemade samosas that carry not just the essence of traditional Indian cuisine, but also the mark of a craftsman.
With this guiding knowledge at your fingertips, the pursuit of the illusive, flaky layers is now within your grasp. Prepare for the kitchen to become your stage, and the creation of homemade samosas your acclaimed performance.
Mastering the Samosa Filling
At the heart of every delicious samosa is the filling, a burst of flavors that makes vegetarian samosas a cherished dish in the realm of savory pastries. To achieve the vibrant taste and aromatic allure of a spice-infused filling, one must embark on a culinary adventure, sautéing a blend of spices until their fragrances are unlocked. The mastery of spicy samosa filling entails more than a mix of ingredients—it calls for a dance of flavors that truly brings the dish to life.
The journey to the perfect samosa filling starts with cumin seeds sizzling in hot oil, joined by the golden touch of minced ginger and the fiery kick of green chilies. For those inclined towards a richer flavor, chopped cashews can be tossed into the mix, adding a nutty depth and crunch. This golden-hued base then welcomes crumbled boiled potatoes—earthy and tender, they mingle with green peas, absorbing the complex spice powders and fresh coriander.
Tip:
A crucial step in the process is the taste test. It’s at this pivotal moment where chefs can adjust for salt, ensuring that their vegetarian samosas reach a balance which pleases both the palate and the eye, with a filling as flavorful as it is colorful.
Creating a delicious samosa filling is similar to painting—a careful selection of spices brushed upon a canvas of potatoes and peas, resulting in a masterpiece worthy of any culinary gallery.
- Heat oil in a pan and add cumin seeds to bloom.
- Add minced ginger and green chilies, sautéing until aromatic.
- Optionally mix in chopped cashews for added texture.
- Incorporate the crumbled boiled potatoes and green peas with care.
- Sprinkle a symphony of spice powders: vibrant Kashmiri red chili powder, earthy cumin powder, tangy amchur (dried mango powder), and warming garam masala.
- Enrich with fresh, chopped coriander for a burst of freshness.
- Tailor the taste by adjusting the salt as needed.
Aspiring samosa artisans, armed with this knowledge, are well on their way to presenting samosas that not only tantalize the taste buds but also pay homage to the rich legacy of this international snack. Whether serving as a standout appetizer or a comfort food for the soul, these spicy and delicious samosas promise a flavor journey from the streets of India straight to the heart.
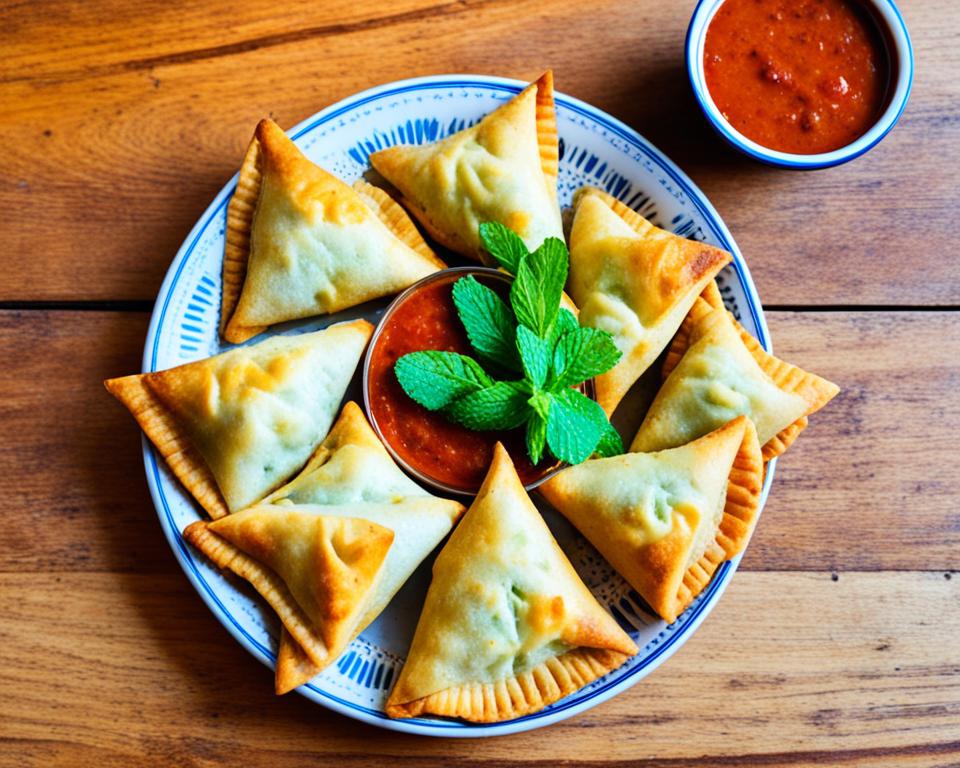
The Art of Shaping Samosas
Embracing the tradition of crafting Indian samosas, enthusiasts embark on a culinary journey that culminates in the perfect union of flavor and texture. Before the delicious samosas take their final form, they begin as a simple dough that is rolled, cut, and shaped with the utmost care. The process is a delicate dance between the dough and the filling, demanding precision for the authentic samosas to attain their legendary crispy exterior and savory core.

Forming the Iconic Samosa Cone
The first step in the art of homemade samosas lies in rolling the dough to just the right thickness—not too thin to tear, nor too thick to cook through properly. As the dough is halved, each semicircle whispers the promise of becoming an iconic samosa cone, a shape synonymous with this beloved snack. To shape the dough, fold the cut edge over itself, forming a cone that stands as the vessel ready to be filled with a concoction of spices and potatoes—each ingredient playing its role in creating the best samosas.
Sealing Edges for Perfectly Filled Samosas
Upon spooning the spiced potato filling into the cone, every move is calculated to avoid any air pockets that might expand during frying, ensuring a perfectly formed samosa. The edges of the dough snap together with a brush of water or a paste made from flour and water, almost like sealing a secret within a pastry envelope. This meticulous sealing process ensures that the samosas remain intact, keeping their flavorful bounty secure as they plunge into the hot oil to emerge golden and irresistibly crispy.
- Roll out the dough to medium thickness for stability and texture.
- Cut the dough into semi-circular discs.
- Shape each disc into a cone and firmly press the edges to seal.
- Carefully spoon in the potato filling, ensuring it’s evenly distributed with no air bubbles.
- Seal the filled samosa with a paste made from flour and water to prevent leaks.
- The best samosas are those that are sealed tightly to retain their delicious filling during frying.
The skillful hands of the samosa maker take great pride in delivering crispy samosas that are not only a joy to the eyes but also a feast for the senses. With every fold and press, the homemade samosas come closer to the delicious ideal. Capturing the essence of authentic samosas, this artful preparation is what transforms a simple snack into an experience of the highest order.
Time to Fry: Achieving Golden Perfection
Into the kitchen we delve, where the aroma of spices hangs thick in the air. Here, in the heart of homemade cuisine, lies the final and most thrilling test in the making of samosas: frying them to golden perfection. For lovers of crispy samosas, those flaky wonders of culinary delight, the act of frying is more than just a cooking technique; it is the alchemy that transforms the humble ingredients into a feast for the senses.
The path to the perfectly fried samosa is one of patience and precision. It begins with heating oil to the precise temperature wherein a small piece of dough, upon its introduction, rises slowly—teasing the surface with just a hint of a bubble. This is the sure sign that it’s the perfect time to introduce the precious parcels into the warm embrace of the oil.
Gently, the samosas make their descent into the pot, the oil cradling them in a tender lull. The flame remains low, an assurance that heat will permeate the dough slowly and steadily. It’s here, in this patient dance of fat and flame, that the frying samosas begin to whisper promises of what they are to become.
The dough kisses the oil and begins its transformation: what was once soft now firms into a protective shell. When the moment is ripe, the heat graduates to a more assertive medium, encouraging the samosas to don their final attire of an enticing golden brown. It’s a sight that heralds triumph—the flaky layers coming into their own, achieving the kind of crispiness that is the hallmark of the best samosas.
But our quest does not end there. For as every true samosa connoisseur knows, the crisp exterior must be matched by an evenly cooked filling, a symphony of spices that have melded in harmony. So we watch and wait, turning each samosa so that every angle may partake in the oil’s sizzling kiss.
To achieve this result consistently, we have curated the following procedural guide—a map, if you will, to the glorious result of frying samosas with expertise.
- Heat oil to a temperature where a small dough piece rises with minimal bubbling.
- Gently slide samosas into the pot, frying on a low flame to harden the crust.
- As the crust firms, increase the heat to medium, frying until crisp and golden.
- Carefully monitor the samosas, seeking an even, rich color and an enticing aroma.
- Retrieve the finished samosas, allowing excess oil to slip away, leaving behind a tantalizing treasure.
As the oil settles and the samosas cool ever so slightly, they become ready to share—their flaky layers, the perfect vessels for the rich potato filling within. Each bite is a testament to the art and heart of Indian cuisine; a perfect golden samosa crafted by a devoted hand.
Flaky Samosas: Quality Ingredients Matter
When it comes to making homemade samosas, the quality of each ingredient is paramount. True connoisseurs know that the secret to the most delightful, flaky pastry is selecting premium inputs that contribute to both taste and texture. A discerning home chef understands that crafting quality samosas is not just an act of cooking, but rather, an exquisite form of edible artistry.
The starting point for exceptional homemade samosas is the dough. Organic all-purpose flour acts as the cornerstone, offering a pure base that results in a pastry delicate and flaky to the touch. As for the fat, high-grade oil or pure ghee is non-negotiable. This choice defines the samosa’s eventual texture — a crisp exterior that cracks perfectly to reveal a heart of spiced, aromatic filling. And let’s not overlook the potatoes; organic ones provide a clean, rich flavor that synthetic additives cannot replicate.
Embarking on the samosa journey, one quickly learns the profound impact that the caliber of ingredients has on the final product. This is a journey of the senses — sight, touch, and taste – brought together by the freshest, finest constituents one can source.

| Ingredient | Role in Samosas | Quality Benchmark |
|---|---|---|
| Organic All-Purpose Flour | Backbone of the dough; dictates texture | Unbleached, no additives, finely milled for smoothness |
| Pure Ghee/High-Grade Oil | Ensures flakiness; enriches flavor | Free of impurities, high smoke point |
| Organic Potatoes | Foundation of the filling | Firm texture, natural taste, grown without synthetic chemicals |
The pursuit of flaky pastry for homemade samosas is as much a practice of patience as it is a study of excellence in ingredients. The blend of textures and tastes achieved in a samosa is not by happy accident but by deliberate and careful selection of each element. Whether one is an expert chef or a cooking enthusiast, paying homage to the integrity of the samosa by using quality ingredients is sure to set their creations apart.
The allure of quality samosas lies in their simplicity and the joy of taking the wholesomeness of nature’s offerings to create something truly extraordinary. So, as you embark on your next homemade samosa endeavor, remember that each choice — from flour to fat to filling — contributes to a final, flaky masterpiece that resonates with authenticity and flavor.
Secrets to a Non-Greasy Samosa Experience
Everyone craves the crispy, flaky layers of a good samosa, but achieving that without the unintended greasiness can be challenging. The quest for creating non-greasy samosas that still boast an enviable crunch has led to the perfection of certain frying techniques. At the core of these methods are two critical factors: precise oil temperature control and a double frying process that takes crispy samosas to the next level.
Oil Temperature: The Crucial Factor
The journey to the best samosas begins with the control of oil temperature —the foundation of best frying practices. Using moderately hot oil maintained at an even, low temperature ensures that the samosas cook thoroughly without absorbing excess oil. The optimal temperature should be such that when a piece of dough is placed in the oil, it sizzles gently and rises to the top without browning too quickly, an indicator that it’s time to fry the samosas. This method not only results in non-greasy samosas but also honors the traditional texture and taste that makes this Indian snack a global favorite.
Double Frying Method: The Crispy Edge
To attain the coveted crispy edge, one must adopt the double frying samosas method. Starting at a lower temperature to seal the pastry’s external layers without introducing greasiness, then elevating the heat to achieve a perfect golden brown finish provides the much-desired crisp exterior. This technique also keeps blisters and bubbles at bay, ensuring the samosas are devoid of excess oil and possess the right crunch. Infusing patience and care into this method ultimately yields a batch of the crispiest samosas, ready to be savored with your favorite dipping sauce.
Adhering to these principles not only leads to a delicious finishing product but also instills a sense of pride in the home cook who, through diligence and attention to detail, can produce samosas that rival even the very best samosas found in Indian bazaars and bustling streets. Embrace these techniques and indulge in the joy of homemade, non-greasy samosas that are just as delightful to look at as they are to eat.
Samosas in the Oven: Baking vs. Frying
The art of making homemade samosas often conjures images of deep-fried delights, but with health-conscious trends on the rise, baking samosas has become a popular alternative. While the deep-frying method is the traditional route to achieving the golden, flaky texture associated with Indian samosas, baking presents a lighter option for those looking to avoid fried foods. However, purists will argue that the crunch and layering of flavors in baked samosas seldom match up to their fried counterparts. To bridge this gap, culinary experiments with puff pastry sheets and meticulous oil brushing have emerged, aimed at replicating the indulgent mouthfeel of the fried original.
For those who appreciate the finesse of a classic fried samosa but want to cut down on calories, here’s a table comparing the two techniques, highlighting the textural and taste differences one can expect:
| Aspect | Deep-Fried Samosas | Baked Samosas |
|---|---|---|
| Texture | Crispy and flaky | Less flaky, slightly crisp |
| Taste Profile | Rich and indulgent | Lighter, less greasy |
| Appearance | Uniform golden brown | Light golden, may vary |
| Preparation Time | Quick frying, requires attention | Longer baking, relatively hands-off |
| Health Consideration | Higher in calories and fats | Reduced calories, fat content varies |
It’s clear that while baked samosas may cater to health considerations, the experience they offer differs significantly from the fried variety. For a closer replication of the crispy texture, it’s essential to understand the role of oil in creating those characteristic layers of flaky pastry — a role that baked versions attempt to approximate through oil brushing techniques.
So, whether it’s the lure of tradition or the pull of a healthier lifestyle, the quest for the perfect samosa may lead down different paths. The choice between baking or frying samosas ultimately rests on individual preferences, with each method bringing its own unique qualities to this age-old, beloved snack.
Complementing Your Samosas with the Perfect Chutneys
What truly elevates the sensory adventure of enjoying Indian samosas is pairing them with the perfect chutney. These classic condiments not only enhance the flavors but also bring a delightful textural play to every bite of your delicious samosas. From the tangy-sweet allure of a traditional tamarind chutney to the herby zing of mint and coriander dips, these are the essential companions to vegetarian samosas.
Whether it’s enjoying a family meal at home or serving a platter of samosas at a gathering, these chutneys can transform the experience, offering a cooling contrast or a punch of flavor that complements the warm spices nestled within the crispy, flaky layers of the samosas.
Traditional Tamarind Chutney
As quintessential as the samosas themselves, tamarind chutney is that bittersweet symphony that plays perfectly against the spiced potato filling of the classic snack. Its rich, deep flavor adds complexity, enhancing each bite with its unique blend of sweet and sour notes. Here’s a simple yet profound layout of what goes into crafting this delightful sauce:
| Ingredient | Flavor Note | Role in Complementing Samosas |
|---|---|---|
| Tamarind Paste | Tart | Base note for the chutney |
| Jaggery or Sugar | Sweet | Balances the tartness of tamarind |
| Ginger Powder | Spicy and Warm | Adds a depth of flavor |
| Cumin Powder | Earthy | Enhances overall taste complexity |
| Chili Powder | Heat | Introduces a subtle kick |
| Salt | Flavor Enhancer | Amplifies the chutney’s flavors |
This chutney can be drizzled over a platter of samosas or served in a small bowl for dipping, ensuring that each mouthful of samosa is a balance of savory filling and tangy-sweet sauce.
Cooling Mint and Coriander Dips
To counter the warm spice quotient of the samosa filling, nothing works better than a mint chutney, with coriander chutney offering an equally refreshing but distinct touch. Both chutneys bring a fresh palate-cleanser to the table, with mint chutney providing a zesty, cooling sensation that is a delightful match to the crispy, flaky texture of the samosa’s crust.
Making these dips is a breeze, yet they provide such depth of freshness that turns any samosa into a gourmet experience. Below is a representation of the components that merge to form these vibrant dips:
| Ingredient | Mint Chutney Flavor | Coriander Chutney Flavor |
|---|---|---|
| Herb Base | Mint Leaves | Coriander Leaves |
| Tangy Element | Lemon Juice | Lemon Juice |
| Sweetness Counter | Sugar (optional) | Sugar (optional) |
| Yogurt Base | Plain Yogurt | Plain Yogurt |
| Seasoning | Salt & Pepper | Salt & Pepper |
| Additional Spice | Green Chilies | Green Chilies |
These chutneys can be smoothly blended to achieve a rich and creamy consistency or more coarsely ground to add a bit of texture to the dipping experience. They are assured to be crowd-pleasers, especially when served alongside vegetarian samosas at your next event.
Preserving the Delight: Storing Samosas
For enthusiasts of homemade samosas, the indulgence doesn’t have to end once the kitchen cools. The craft of storing samosas ensures these crispy delicacies remain as delightful as the moment they emerged golden and fragrant from the oil. Whether it’s keeping them for later or preparing samosas ahead of time, understanding the nuances of refrigeration and freezing can make all the difference in preserving their taste and texture.
Refrigeration Techniques for Freshness
To maintain the crispness and savor of reheating samosas, storing them correctly in the refrigerator is essential. The key is an airtight container that locks in freshness but prevents moisture buildup which can lead to sogginess. When stored properly, a samosa’s life extends significantly, with its flavorful filling and flaky pastry kept intact. To rejuvenate these stored snacks and revitalize their crispy samosas essence, a brief reheating in the oven is all it takes to bring back that signature crunch and warmth.
Freezing and Reheating Tips
Freezing samosas is a fantastic way to ensure a long-term supply of this beloved snack. Once cooled, place the samosas in a single layer on a baking sheet to freeze them. Once they’re solid, transfer them to a freezer-safe bag, squeezing out as much air as possible before sealing. This prevents freezer burn and preserves the samosas’ original flavors and textures. When it’s time to indulge, reheating for freshness doesn’t require thawing; simply brush them with a little oil and pop them in the oven. This method revives the samosas to nearly their fresh-out-of-the-fryer glory, ready to be enjoyed once more.
| Method | Storage Duration | Instructions |
|---|---|---|
| Refrigeration | 3-4 Days | Store in an airtight container; reheat in an oven for crispiness. |
| Freezing | Up to 3 Months | Freeze individually, then store in a freezer bag; bake from frozen with a brush of oil. |
Conclusion
The quest for creating the quintessential homemade samosas takes enthusiasts through a historical gastronomic journey, bringing to light the meticulous practice of turning simple ingredients into golden, flaky samosas. Embedded in tradition and refined through the centuries, the making of these savory delights speaks of the rich narrative of the Middle East, the vibrant culture of India, and the hearts of culinary adventurers across the world. With the use of quality ingredients and precise preparation techniques, the best samosas can be achieved, mirroring the exemplary standards of the finest eateries. They emerge from hot oil not just as a snack, but as a celebration of authentic, handcrafted perfection.
Accompaniment is equally as critical as the main act, hence serving samosas with the perfect chutneys is not just a recommendation; it’s a rite. The tangy tamarind and the refreshing mint and coriander chutneys are more than condiments; they are the harmonizing notes that accentuate the robust flavors of this iconic snack. Integrating these elements into the samosa experience ensures each bite holds the potential to transport one straight to the bustling streets where these iconic snacks first claimed their fame.
Understanding how to preserve authentic samosas for later delight is as important as their preparation. Whether stored in the crisp coolness of a refrigerator or the embracing freeze of the cold storage, these practices ensure that the joy of indulging in homemade savory treats can be a repeatable experience. This art of preservation allows one to enjoy their kitchen’s craftsmanship beyond the confines of time, rendering home kitchens a timeless source of comfort and flavor. Thus, homemade samosas stand as delightful triumphs—golden parcels of tradition, neatly folded, and fried to an artful crispness.
FAQ
How can I achieve flakiness in my homemade samosas?
Flakiness is obtained by rubbing a fat source such as oil or ghee with flour until a breadcrumb-like texture is formed. A well-incorporated fat ensures the flaky layers in the pastry after frying.
What are the key ingredients for authentic Indian samosa filling?
A classic Indian samosa filling includes crumbled boiled potatoes, herbs like coriander, and spices such as Kashmiri red chili powder, garam masala, cumin powder, and amchur. These provide a robust flavor that defines the authentic samosa experience.
How thick should the dough be rolled out for samosas?
The dough should be rolled out evenly to a medium thickness. It should be thin enough to fry to a crispy texture, but thick enough to hold the filling without tearing.
What’s the best way to seal samosas?
Use water or a flour-water paste to moisten the edges of the samosa dough before sealing. Press firmly to ensure the edges adhere together, and there is no leakage during frying.
Can I bake samosas instead of frying them?
Yes, samosas can be baked as a healthier alternative to frying, although they may lack the traditional texture. For a flakier result, you can use puff pastry sheets and brush with oil before baking.
How do I know when the oil is at the right temperature for frying samosas?
The oil is at the correct temperature when a small piece of dough rises slowly to the top with light bubbling around it. Start frying on a low flame to firm up the crust and finish with medium heat to achieve golden-brown crispiness.
What are the best chutneys to serve with samosas?
Tamarind chutney, with its sweet and tart flavor, and mint or coriander chutney, with a refreshing zesty taste, are excellent complements to the warm spices within samosas.
How do I store samosas to keep them crispy?
Samosas should be stored in an airtight container in the refrigerator to maintain crispiness. To reheat, bake them in an oven until they are warm and crisp again.
Can I freeze samosas? How do I reheat them?
Yes, samosas can be frozen. Freeze them on a baking sheet until firm before transferring to a freezer bag. Reheat by baking in the oven after brushing with oil to retain the crispiness and flavor.
What frying technique ensures non-greasy, crispy samosas?
The double frying technique helps achieve non-greasy, crispy samosas. Initially, fry them at a lower temperature to cook through, then increase the heat to crisp up the exterior. Managing the oil temperature is crucial to this process.