Welcome to our delightful collection of mouthwatering flaky dessert recipes! If you have a sweet tooth and love indulging in delicious sweet treats, you’re in for a treat. We’ve curated a list of easy dessert ideas that will satisfy even the most discerning dessert lovers. From classic favorites to irresistible creations, these recipes are guaranteed to impress.
Key Takeaways:
- Indulge in the irresistible flavors of homemade desserts with these mouthwatering flaky dessert recipes.
- From chocolate-dipped strawberries to creamy vegan coconut milk ice cream, there’s a dessert to suit every taste.
- These easy dessert ideas are perfect for any occasion, whether it’s a special celebration or a cozy night in.
- Get creative and have fun experimenting with different flavors and toppings to make these recipes your own.
- Prepare to impress your friends and family with these delectable sweet treats that are as beautiful as they are delicious.
Decadent Chocolate-Dipped Strawberries
If you’re looking for an easy dessert recipe that is sure to impress, look no further than chocolate-dipped strawberries. These mouthwatering treats are perfect for special occasions and are incredibly simple to make. All you need are fresh, juicy strawberries and decadent chocolate.
To ensure that the chocolate sticks well to the strawberries, it’s important to make sure the strawberries are dry before dipping. Simply wash and pat them dry with a paper towel. This will help the chocolate adhere to the strawberries, creating a beautiful and delicious dessert.
Once the strawberries are dry, it’s time to dip them in the chocolate. You can use either dark, milk, or white chocolate, depending on your preference. Melt the chocolate in a microwave-safe bowl or using a double boiler, stirring until smooth.
Hold the strawberry by the stem and dip it into the melted chocolate, coating the strawberry about three-quarters of the way. Lift the strawberry out of the chocolate and let any excess chocolate drip off. Place the chocolate-dipped strawberry onto a parchment-lined baking sheet or a wire rack to allow the chocolate to set.
For an extra touch of elegance, you can drizzle melted white or dark chocolate over the strawberries using a piping bag or a fork. This adds a beautiful design and enhances the visual appeal of the dessert.
Once the chocolate has set, your decadent chocolate-dipped strawberries are ready to be enjoyed. Serve them as a standalone dessert or as a delightful accompaniment to other sweet treats. They also make a stunning centerpiece for a dessert table at special events.
So, the next time you’re in need of a special occasion dessert that is both easy to make and absolutely delicious, give chocolate-dipped strawberries a try. They’re guaranteed to impress your guests and satisfy your cravings for a sweet and indulgent treat.
| Ingredients: | Instructions: |
|---|---|
| – Fresh strawberries | 1. Wash and dry the strawberries |
| – Decadent chocolate | 2. Melt the chocolate |
| 3. Dip the strawberries in the chocolate | |
| 4. Let the chocolate set | |
| 5. Optional: Drizzle melted chocolate |
So why wait? Try making these decadent chocolate-dipped strawberries today and add a touch of elegance to your special occasions.
Irresistible Vanilla Cupcakes with Buttercream Frosting
At long last, we present to you our recipe for irresistibly moist vanilla cupcakes with a velvety texture. These homemade cupcakes will surely become a family favorite, and with just a few simple ingredients, you’ll be able to whip up a batch whenever the craving strikes.
The Perfect Cupcake Base
We start with a basic vanilla cupcake batter, made with pantry staples like flour, sugar, butter, eggs, and vanilla extract. The key to achieving a moist and tender crumb is to ensure that all the ingredients are at room temperature before mixing. This allows for better incorporation and results in a light and fluffy cupcake.
A Creamy Buttercream Frosting
No vanilla cupcake is complete without a generous swirl of creamy buttercream frosting on top. To make this luscious frosting, you’ll need butter, powdered sugar, vanilla extract, and a touch of milk. Beat the ingredients together until smooth and fluffy, then transfer the frosting to a piping bag fitted with your favorite tip. Create beautiful, decorative designs on each cupcake, or simply spread the frosting with a knife for a more rustic look.
Decoration and Sprinkles: Adding the Finishing Touches
Now comes the fun part – decoration! Once your cupcakes are frosted, you can get creative with various decorating options. Sprinkle some colorful jimmies or nonpareil sprinkles over the frosting for an extra pop of color and texture. Or, if you prefer a more elegant look, place a delicate fondant flower or a drizzle of caramel sauce on top.
For visual inspiration, take a look at this mouthwatering image of our vanilla cupcakes with buttercream frosting:
These velvety vanilla cupcakes with creamy buttercream frosting are perfect for any occasion – birthdays, weddings, or simply as a sweet treat to enjoy with a cup of tea. The combination of a moist cupcake base and a rich, velvety frosting is unbeatable, and we guarantee they’ll be devoured in no time!
Fun and Easy Cake Pops
Looking for a delicious and kid-friendly dessert that’s also easy to make? Look no further than these adorable cake pops! With just a few basic ingredients and a little creativity, you can create these bite-sized treats that are sure to be a hit with both kids and adults.
What makes cake pops so much fun is their versatility. You can customize them with different cake flavors, frosting colors, and decorations to suit any occasion. Whether you’re celebrating a birthday, hosting a party, or simply want to indulge in a sweet treat, cake pops are the perfect choice.
To get started, you’ll need:
- A box of your favorite cake mix
- A tub of frosting in a complementary flavor
- Lollipop sticks
- Candy melts or chocolate chips for coating
- Sprinkles, candies, or other decorations for garnishing
Here’s a step-by-step guide to creating your own cake pops:
- Bake the cake according to the package instructions and let it cool completely.
- Crumble the cake into fine crumbs using your hands or a food processor.
- Add about half of the frosting to the cake crumbs and mix until well combined. The mixture should be moist enough to hold its shape when rolled into a ball.
- Using your hands, roll the cake mixture into small balls and place them on a lined baking sheet.
- Insert a lollipop stick into each cake ball, making sure it’s securely in place.
- Place the cake pops in the freezer for about 15 minutes to firm up.
- In the meantime, melt the candy melts or chocolate chips according to the package instructions.
- Dip each cake pop into the melted coating, making sure it’s evenly coated.
- Decorate the cake pops with sprinkles, candies, or any other toppings of your choice.
- Place the finished cake pops back on the lined baking sheet and let them set.
- Enjoy your homemade cake pops!
With their irresistible taste and cute appearance, cake pops are a surefire way to impress your friends and family. They also make great gifts or party favors. So why not gather your little ones and have a fun-filled baking session together? Not only will you create delicious treats, but you’ll also make precious memories that will last a lifetime.
Expert Tip:
For an extra special touch, drizzle contrasting colors of melted candy melts or chocolate over the cake pops for a stunning marble effect. This not only adds visual appeal but also enhances the flavor profile of your cake pops.
Decadent Chocolate Ganache Cake
In this section, we’re about to unveil a showstopper – the Decadent Chocolate Ganache Cake. Prepare to be mesmerized by this rich and moist chocolate lover’s dream cake. With generous amounts of chocolate chunks throughout and a luscious creamy chocolate ganache topping, this cake is the epitome of indulgence. The best part? It’s surprisingly easy to create this masterpiece, and you can have it ready to devour in just one hour.
What sets this cake apart is its exceptional taste and texture. Every bite is a heavenly experience, with the moistness of the cake complementing the intense chocolate flavors. The buttery goodness melts in your mouth, leaving you craving for more.
You might wonder, what’s the secret to achieving the perfect chocolate ganache cake? It lies in the selection of high-quality chocolate and a straightforward recipe that requires minimal effort. Let’s dive into the easy step-by-step process:
- Preheat your oven to 350°F (175°C) and prepare a round cake pan by greasing and flouring it.
- In a large mixing bowl, combine the following dry ingredients:
| Dry Ingredients: | Quantity: |
|---|---|
| All-purpose flour | 2 cups |
| Granulated sugar | 1 3/4 cups |
| Unsweetened cocoa powder | 3/4 cup |
| Baking powder | 1 1/2 teaspoons |
| Baking soda | 1 1/2 teaspoons |
| Salt | 1 teaspoon |
- Make a well in the center of the dry ingredients and add the following wet ingredients:
| Wet Ingredients: | Quantity: |
|---|---|
| Buttermilk | 1 cup |
| Vegetable oil | 1/2 cup |
| Eggs | 2 large |
| Vanilla extract | 2 teaspoons |
- Using an electric mixer, beat the mixture on medium speed until well combined and smooth.
- Next, add 1 cup of hot water to the batter and mix on low speed until the water is fully incorporated.
- Stir in a generous amount of chocolate chunks to add extra bursts of chocolate goodness throughout the cake.
- Pour the batter into the prepared cake pan and smooth the surface with a spatula.
- Bake in the preheated oven for approximately 30-35 minutes, or until a toothpick inserted into the center comes out clean.
- While the cake is baking, let’s prepare the velvety chocolate ganache.
Decadent Chocolate Ganache:
In a small saucepan, heat 1 cup of heavy cream until it just starts to simmer. Remove from heat and pour over 8 ounces of finely chopped dark chocolate in a heatproof bowl. Allow the mixture to sit for a minute or two, then gently stir until the chocolate is completely melted and the ganache is smooth and glossy.
Once your cake has cooled, drizzle the delectable chocolate ganache over the top, allowing it to cascade down the sides for an irresistibly elegant look.
Now, prepare yourself for the ultimate chocolate experience. Slice into the moist, rich chocolate ganache cake and let the flavors envelop your taste buds. With each bite, you’ll fall deeper and deeper in love with this easy recipe that delivers on all levels of chocolate decadence.
Indulge in the divine pleasure of this chocolate ganache cake – a true masterpiece that will leave you wanting more. Try your hand at this recipe and become the esteemed baker of this rich and moist delight.
Heavenly Six-Layer Dessert
This decadent dessert features six different layers, each as delicious as the last. Prepare yourself for an indulgent dessert experience with the perfect combination of flavors and textures. From the crunchy pecan crust to the sweetened whipped cream cheese and the rich chocolate and vanilla puddings, every bite of this six-layer dessert will transport you to dessert heaven.
Let’s break down the layers that make this dessert so heavenly:
- Crunchy Pecan Crust
- Sweetened Whipped Cream Cheese
- Rich Chocolate Pudding
- Luscious Vanilla Pudding
- Fluffy Whipped Cream
- Decadent Chocolate Ganache
Each layer adds a unique element to the dessert, creating a symphony of flavors and a delightful sensory experience. The crunchy pecan crust provides a satisfying contrast to the creamy layers that follow. The sweetened whipped cream cheese balances the richness of the chocolate and vanilla puddings, adding a hint of tanginess. And the fluffy whipped cream and decadent chocolate ganache on top provide the perfect finishing touch.
Here’s a visual representation of the heavenly six-layer dessert:
| Layer | Description |
|---|---|
| 1 | Crunchy Pecan Crust |
| 2 | Sweetened Whipped Cream Cheese |
| 3 | Rich Chocolate Pudding |
| 4 | Luscious Vanilla Pudding |
| 5 | Fluffy Whipped Cream |
| 6 | Decadent Chocolate Ganache |
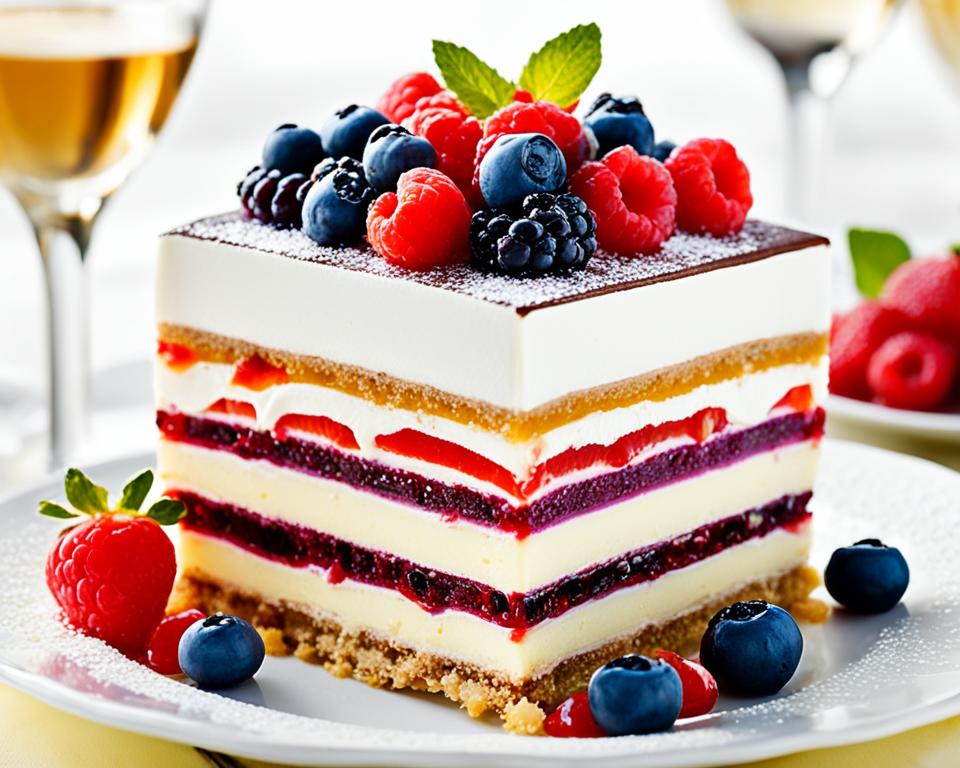
No dessert lover can resist the allure of this six-layer creation. It’s a showstopper at any gathering and guarantees to satisfy even the most discerning sweet tooth. Whether you’re celebrating a special occasion or simply treating yourself, indulge in the delicious layers of this heavenly six-layer dessert.
Gooey S’more Cookie Bars
If you’re a fan of s’mores, you’re going to love these gooey S’more Cookie Bars! These chocolatey cookie bars are packed with gooey marshmallow creme and chocolate chips, giving them a heavenly combination of flavors and textures. They’re perfect for picnics, holiday parties, or anytime you’re craving a delicious treat.
The secret to these delectable cookie bars is the irresistible combination of the gooey marshmallow creme and the rich chocolate chips. As you take a bite, you’ll experience the chewy and soft texture of the cookie base, followed by the ooey-gooey sweetness of the marshmallow creme. The chocolate chips add an extra layer of richness, making every bite a delightful explosion of flavors.
These S’more Cookie Bars are incredibly easy to make. Simply prepare the cookie dough, spread it in a baking pan, and layer it with marshmallow creme and chocolate chips. Bake until golden brown and let them cool before slicing into squares. It’s that simple!
Ingredients:
- 1 cup unsalted butter, softened
- 1 cup granulated sugar
- 1 cup brown sugar
- 2 large eggs
- 1 teaspoon vanilla extract
- 2 1/2 cups all-purpose flour
- 1 teaspoon baking soda
- 1/2 teaspoon salt
- 1 1/2 cups marshmallow creme
- 1 cup chocolate chips
Once you’ve gathered all the ingredients, it’s time to start baking these irresistible S’more Cookie Bars. The combination of gooey marshmallow creme and chocolate chips will make them a hit with everyone who tries them.
Instructions:
- Preheat the oven to 350°F (175°C) and grease a 9×13-inch baking pan.
- In a large mixing bowl, cream together the softened butter, granulated sugar, and brown sugar until light and fluffy.
- Add the eggs one at a time, beating well after each addition. Stir in the vanilla extract.
- In a separate bowl, whisk together the flour, baking soda, and salt. Gradually add the dry ingredients to the wet ingredients, mixing until just combined.
- Spread two-thirds of the cookie dough evenly into the prepared baking pan.
- Spread the marshmallow creme over the cookie dough layer.
- Sprinkle the chocolate chips over the marshmallow creme.
- Crumble the remaining cookie dough over the top of the chocolate chips.
- Bake for 25-30 minutes or until the top is golden brown.
- Allow the cookie bars to cool completely before cutting them into squares.
Once you’ve baked these gooey S’more Cookie Bars, you’ll have a delectable treat that is sure to please everyone. Whether you’re enjoying them at a picnic or serving them as a dessert at a holiday gathering, these cookie bars will be a hit!
So why not satisfy your sweet tooth with a batch of these delicious S’more Cookie Bars? The combination of gooey marshmallow creme, rich chocolate chips, and chewy cookie base will have you coming back for seconds. Try this recipe today and treat yourself to a little slice of decadence!
Creamy Vegan Coconut Milk Ice Cream
If you’re craving a cold and satisfying treat but follow a vegan or dairy-free lifestyle, look no further than our Creamy Vegan Coconut Milk Ice Cream. With just three simple ingredients, you’ll be able to whip up a delightful dessert that is rich, smooth, and oh-so-yummy!
Our vegan ice cream starts with a coconut milk base, which provides a creamy texture and a subtle tropical flavor. The full-fat coconut milk adds richness while ensuring a velvety smoothness that rivals traditional dairy-based ice creams.
To enhance the flavor and add a bit of nuttiness, we recommend adding a spoonful of tahini to the mix. Tahini, made from ground sesame seeds, complements the coconut milk beautifully, creating a harmony of flavors that will leave your taste buds satisfied.
Here’s the simple recipe for our Creamy Vegan Coconut Milk Ice Cream:
| Ingredients: | Instructions: |
|---|---|
|
|
This dairy-free dessert is not only delicious but also versatile. You can customize it by adding your favorite mix-ins such as chocolate chips, chopped nuts, or fresh fruit. Get creative and make it your own!
Indulge in the lusciousness of our creamy vegan coconut milk ice cream, guilt-free. Whether you follow a vegan diet, have lactose intolerance, or simply want to try something new, this dairy-free delight will satisfy your cravings and keep you coming back for more.
Try our Creamy Vegan Coconut Milk Ice Cream today and experience the perfect blend of creamy coconut milk, luscious tahini, and guilt-free indulgence.
Decadent Avocado Chocolate Mousse
If you’re looking for a delicious and guilt-free dessert, look no further than this decadent avocado chocolate mousse. Made with nutrient-dense avocados, this creamy and indulgent treat is perfect for those following a vegan, paleo, or gluten-free diet. Plus, it’s incredibly easy to make!
The secret ingredient in this recipe is the avocado, which adds a rich and creamy texture to the mousse. Not only does it create a velvety base, but it also provides a host of health benefits. Avocados are packed with heart-healthy monounsaturated fats, fiber, and essential vitamins and minerals.
To make this avocado chocolate mousse, all you need are a few simple ingredients:
- 2 ripe avocados
- 1/4 cup cocoa powder
- 1/4 cup maple syrup or honey
- 1/4 cup almond milk (or any plant-based milk)
- 1 teaspoon vanilla extract
- A pinch of salt
Simply blend all the ingredients together in a food processor or blender until smooth and creamy. You can adjust the sweetness by adding more or less maple syrup or honey, depending on your preference.
“The avocado chocolate mousse has quickly become one of our favorite guilt-free desserts. The combination of creamy avocado and rich cocoa creates a velvety-smooth texture that is truly satisfying,” says Emma, a devoted fan of this recipe.
Serve the avocado chocolate mousse in individual bowls or glasses, and garnish with your favorite toppings like fresh berries, shaved chocolate, or a dollop of coconut whipped cream. It’s a show-stopping dessert that will impress your guests while keeping your diet on track.
Indulge in this heavenly avocado chocolate mousse that satisfies your sweet tooth and nourishes your body. Whether you follow a vegan, paleo, or gluten-free lifestyle, this dessert is sure to be a hit!
Frozen Cherry Vanilla Pudding Delight
Looking for a refreshing summer treat? Look no further! Our frozen cherry vanilla pudding is the perfect dessert to beat the heat. This delightful frozen dessert combines the sweet, juicy flavors of cherries with homemade vanilla pudding for a mouthwatering combination.
With just a few simple ingredients, you can create a frozen dessert that will impress your friends and family. The cherry vanilla pudding is easy to make and requires no special equipment. Simply whip up the pudding, layer it with cherries, and freeze until firm.
Not only is this frozen cherry vanilla pudding delicious, but it’s also a beautiful dessert to serve. The vibrant red cherries against the creamy vanilla pudding create a visually stunning treat that is sure to impress. It’s the perfect dessert to showcase at summer parties or enjoy on a hot day.
Here’s what you’ll need to make this refreshing summer treat:
- 1 cup fresh cherries, pitted and halved
- 1 batch of homemade vanilla pudding
- Whipped cream for serving (optional)
And here’s how to make it:
- In a serving dish or individual cups, layer the cherry halves on the bottom.
- Pour the homemade vanilla pudding over the cherries, covering them completely.
- Place the dish or cups in the freezer and let it set for at least 4 hours or until firm.
- Remove from the freezer, serve with a dollop of whipped cream if desired, and enjoy!
This frozen cherry vanilla pudding is a versatile dessert that can be enjoyed on its own or paired with other toppings. Get creative and try adding chocolate shavings, crushed nuts, or a drizzle of chocolate sauce for some extra indulgence.
So why wait? Beat the summer heat with this refreshing cherry vanilla pudding delight. Whether you’re enjoying it by the pool or at a backyard barbecue, this frozen dessert is sure to be a crowd-pleaser.
Conclusion
These mouthwatering flaky dessert recipes are just a taste of the many delicious sweet treats you can create. Whether you’re craving something chocolatey, fruity, or creamy, these indulgent sweet dishes are sure to satisfy your dessert cravings. From the classic decadence of chocolate-dipped strawberries to the refreshing delight of frozen cherry vanilla pudding, there’s an array of tasty dessert ideas for every occasion.
Indulge in the irresistible flavors of homemade desserts and surprise your loved ones with these delectable creations. From the simple and easy-to-make cake pops to the heavenly layers of a six-layer dessert, these recipes offer a range of options for both novice and experienced bakers. Not only will your taste buds thank you, but your friends and family will be delighted by your culinary skills.
So why wait? Prepare these mouthwatering flaky dessert recipes and treat yourself to a delightful dessert experience. From the moist and velvety vanilla cupcakes with buttercream frosting to the creamy and rich avocado chocolate mousse, each recipe promises a delicious and satisfying end to any meal. Discover the joy of homemade desserts and create unforgettable memories with every bite. Happy baking!
FAQ
Can you provide some easy dessert ideas?
Absolutely! We have a variety of delicious sweet treats that are simple to make.
What are some homemade desserts that are perfect for a special occasion?
One mouthwatering dessert idea for a special occasion is decadent chocolate-dipped strawberries.
How can I make irresistible vanilla cupcakes with buttercream frosting?
Our simple recipe will guide you in making moist vanilla cupcakes with a velvety texture and creamy vanilla buttercream frosting.
Are there any fun and easy dessert recipes that kids can enjoy making?
Yes! Our cake pops recipe requires just a few ingredients and is a fun activity for kids to participate in.
Do you have a recipe for a rich and moist chocolate ganache cake?
Absolutely! Our decadent chocolate ganache cake is loaded with chocolate chunks and topped with a creamy chocolate ganache.
Can you share a recipe for a heavenly six-layer dessert?
Yes! Our six-layer dessert features a crunchy pecan crust, sweetened whipped cream cheese, and chocolate and vanilla puddings for a truly indulgent dessert.
What’s a delicious dessert recipe with gooey marshmallow creme and chocolate chips?
Our chocolatey cookie bars are packed with gooey marshmallow creme and chocolate chips, making them a perfect treat for picnics and parties.
Is there a recipe for creamy vegan coconut milk ice cream?
Absolutely! Our vegan coconut milk ice cream is made with just three ingredients and has a creamy and rich flavor.
Can you provide a recipe for a decadent avocado chocolate mousse?
Yes! Our avocado chocolate mousse is perfect for those following a vegan, paleo, or gluten-free diet and is incredibly simple to make.
Do you have a frozen dessert recipe for hot summer days?
Absolutely! Our frozen cherry vanilla pudding is a refreshing and delicious treat for those hot summer days.
What other mouthwatering flaky dessert recipes do you have?
These dessert recipes are just a taste of the many sweet treats you can create. From chocolate-dipped strawberries to frozen cherry vanilla pudding, there’s something to satisfy every craving.

